Showing posts with label Technical. Show all posts

Thursday, February 3, 2011

Vortex PS-100 P&S Attachment


I recently addressed the problem of today's point & shoot digital cameras and popular DCA style digiscoping adapters. Because newer point & shoot digital camera models typically lack any kind of filter thread, they won't connect to a DCA. The Vortex Point & Shoot Attachment (PS-100) should eliminate this problem.


A type of platform adapter, the PS-100 will give just about any point & shoot digital camera a filter thread so it can be used with any of the various DCA adapters on the market. It's super easy to configure - the small platform attaches to the camera via the camera's tripod thread and the adjustable sight is centered with the camera's lens. This attachment will work with the Vortex Razor DCA, Swarovski DCA, and both Kowa DCA adapters (DA10 and DA1).

Note: The PS-100's thread size is 37mm.

Link: Vortex Point & Shoot Attachment

Wednesday, January 26, 2011

Digiscoping Today


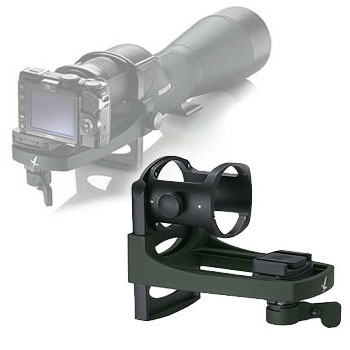
Swarovski 80HD & UCA Adapter

It's increasingly difficult for me to recommend a particular camera model for digiscoping. Gone are the days of 'digiscoping simplicity' with with Nikon's Coolpix point & shoot digital cameras like the 990, 995, 4500, 8400, P5100, and P6000. The 900 series (including the 4500) had an internal zoom lens with a convenient 28mm filter thread where a DCA style digiscoping adapter could connect directly to the camera. The 8400, P5100, and P6000 had inexpensive UR-Enn accessory adapters that gave the camera a filter thread to facilitate a DCA connection. There were also digital cameras by Canon and Sony that offered similar configurations. Back in those days it was easy to recommend a camera for digiscoping.

It's a different story today. Point & shoot digital cameras with simple thread-based features are virtually non-existent, rendering DCAs somewhat obsolete for this type of digiscoping. (There might still be an accessory adapter option available for a point & shoot digital camera from BugEyeDigital, but selection is pretty limited.) This doesn't mean you can no longer use a point & shoot digital camera for digiscoping, but your best option at the present time is to go with a spotting scope that has a proprietary bracket adapter like the
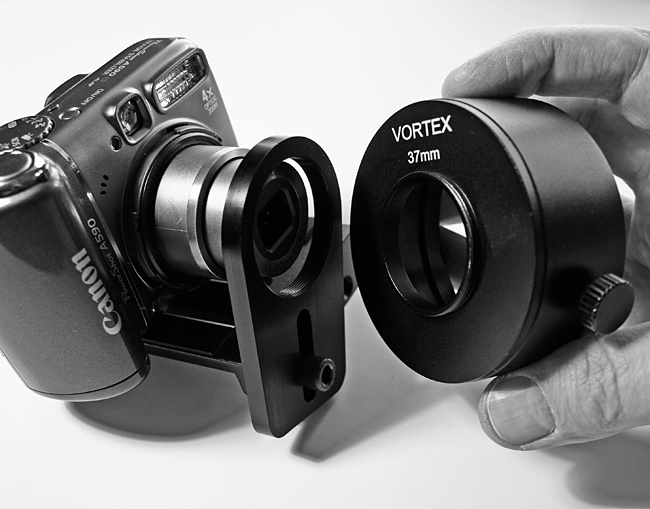
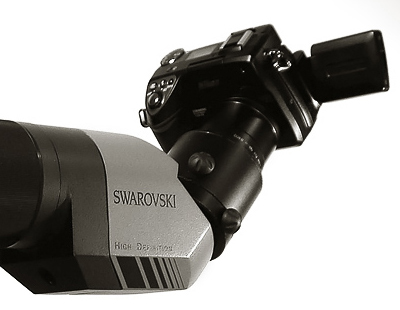
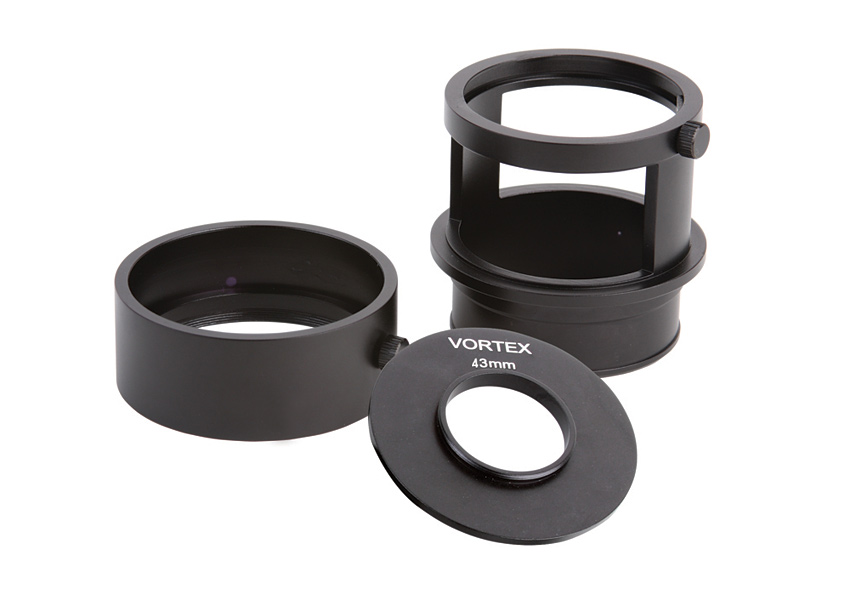
 Swarovski UCA, Kowa's DA-4, or the 
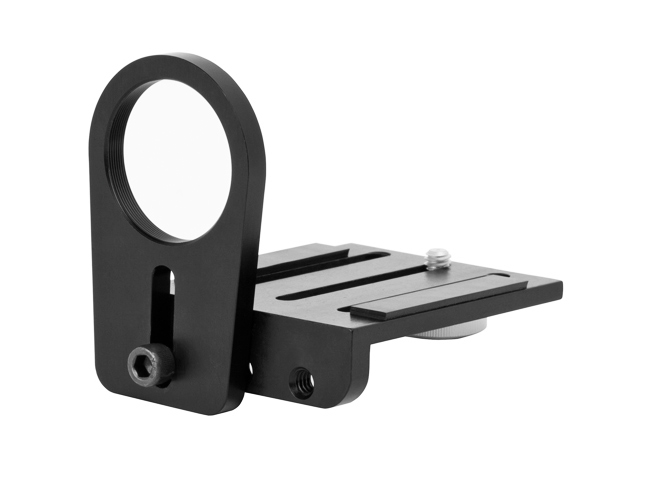
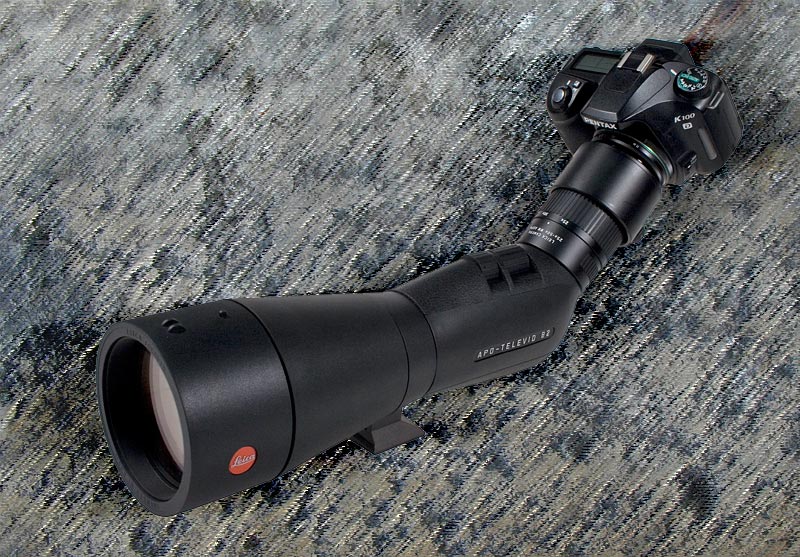
Zeiss Quick Adapter II – all work extremely well. If you choose to digiscope with a DSLR, either a DCA or photo-adapter can be used; this is the most 'universality' you're likely to obtain in the realm of digiscoping.

While I really can't recommend a particular camera model for digiscoping, I can tell you what basic specifications it should have. For point & shoot digital cameras, make sure the optical zoom is 5x or less to eliminate problems with vignetting. Also, it's beneficial if the camera has a large LCD monitor (most do) so you can comfortably view what you're photographing. For 
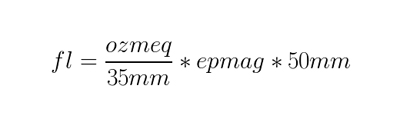
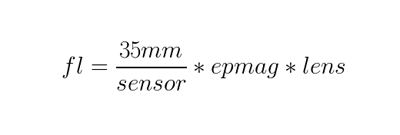
DSLR to DCA configurations, you'll need a short focal length fixed lens like a 35mm, 40mm, or 50mm. Any DSLR will work with a photo-adapter provided you have the correct T-ring to complete the connection.

There is a free on-line forum where you can find what's on the cutting edge in terms of digital cameras for digiscoping, including newer 4/3's format. A few veteran digiscopers are constantly experimenting, especially Neil Fifer and Clay Taylor. So, if you're interested in digiscoping and are unsure of how to go about it, I recommend subscribing to the tech group so you can view their test results and follow the conversation. These are the individuals whose opinions I seek when I'm in the market for a new digiscoping camera.

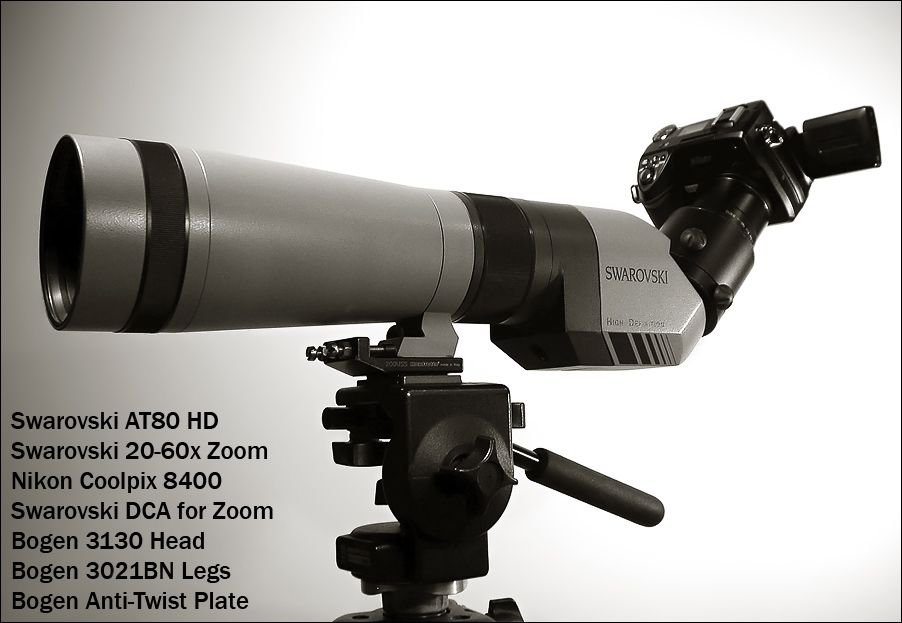
For now, I'm a retro-digiscoper. I still use the discontinued Nikon Coolpix 8400 and probably won't upgrade to a different camera until it either dies or something better comes along. You can still find the 8400 on Amazon.com, but last time I checked they were priced around $800.00. Do your homework before you buy a scope, adapter, or digital camera. It's a very sad email or phone call when I have to tell someone what they've purchased isn't going to work.

Thursday, March 4, 2010

Question about Optical Zoom


Q: Most point & shoot digital cameras come with lenses that are 3x, 10x, 12x, etc., but most SLR cameras use telephoto lenses that are 100mm, 300mm, etc. What is the relationship between the two systems? In other words, a 12x digital point and shoot equals what in a telephoto SLR lens? What is the conversion factor?

A: Point & shoot digital cameras have 35mm equivalencies, but they cannot be derived from knowing just the optical zoom because every model can be unique. For example, each digital camera model below is listed with its maximum optical zoom and corresponding 35mm equivalency zoom range (focal lengths) provided by the manufacturer:

  • Canon PowerShot SX1020x Optical Zoom / 28 - 560 mm
  • Sony Cyber-shot DSC-H20 10x Optical zoom / 38 - 380mm
  • Nikon Coolpix 84003.5x Optical Zoom / 24 - 85mm
  • Nikon Coolpix P5000 3.5x Optical Zoom / 36 - 126mm

Notice that each camera has a different 35mm equivalency at 1x optical zoom. The two Nikon cameras have the same optical zoom (3.5x), but different 35mm equivalencies. This is because digital camera manufacturers can put whatever configuration of lens elements they want into an optical zoom system and won't necessarily render the same 35mm equivalency. However, the optical zoom can be computed by dividing the maximum 35mm equivalency focal length by the minimum:

  • 560mm / 28mm = 20x
  • 380mm / 38mm = 10x
  • 85mm / 24mm = 3.5x
  • 126mm / 36mm = 3.5x

And that's where the optical zoom number comes from! Optical zoom is only regarded as magnification in the sense of how many times the minimum focal length in 35mm equivalency is being multiplied. If you want to calculate true magnification, simply divided focal length by 50 (from 50mm = 1x in 35mm equivalency).

Thursday, December 3, 2009

Aperture and Digiscoping


60, 65, 77, 80, or 88mm?

Though digiscoping has opened the doors of nature photography for thousands of birders and other outdoor enthusiasts, it's still not a "silver bullet" when it comes to obtaining great results. This can be somewhat subjective, as people aren't necessarily seeking a particular level quality when it comes to digiscoping. However, I do feel it's a compliment to digiscoping whenever it is compared, albeit somewhat skeptically and critically, to high-end super-telephoto setups that cost thousands of dollars more. A common question is what effect will a smaller aperture scope have versus a large one when it comes to digiscoping.

Due to a typically large focal ratio (between aperture and focal length), spotting scopes are inherently optically slow even before you attach a camera. Light gathering is crucial when digiscoping. A small aperture spotting scope lets in less light, which directly results in slower shutter speeds, so if you're unable to achieve a shutter speed of at least 1/125th of a second, it will be very difficult to freeze subtle movements of even a perched bird. Low shutter speeds often result in blurry images, one of the most common pitfalls facing both novice and seasoned digiscopers.

Less light being gathered also means an overall decrease in color, contrast, and resolution (nearly 20% when going from a 80mm to a 65mm scope). Post-processing your work with image editing software and tweaking contrast levels, brightness, and sharpness can restore some aspects of this loss. While I've seen exceptional results taken with some of the high-end APO, HD, and ED 60mm to 66mm spotting scopes, I personally recommend 80 millimeters or greater for the best possible digiscoping results.

Smaller aperture spotting scopes are made for a good reason; they're smaller and lighter in weight. Lugging around a large spotting scope and tripod can become burdensome on long hikes, and the relatively nominal lighter weight scopes do seem to make a difference for many individuals, especially those with neck or back problems. It essentially comes down to a question of priorities: are you going to place an emphasis on photography, or would carrying a lighter weight spotting scope benefit your outdoor excursions? It's ultimately up to you, but now you know what the tradeoffs are to make a more informed decision before purchasing a scope.

Read more: Will the smaller 65mm scope fit my needs?

© 2009 Mike McDowell

Tuesday, October 27, 2009

More about DSLR Digiscoping


Someone we need to see more digiscoping from is my co-worker Ben Lizdas of 600 birds blog. He's made a few changes to his digiscoping rig since last time I blogged about him, upgrading from the Leica Televid 77 APO to the new Leica Televid 82 APO. This gorgeous photo of a Bald Eagle was digiscoped by Ben with his new setup the last time he went to Homer, Alaska:


Ben's a fan of Swarovski's DCA and discovered that the outer tube fits nicely over the new Leica 25-50x zoom eyepiece. To learn more about Ben's digiscoping style and technique, read his recent blog article on the advantages of digiscoping using a DSLR, a configuration I've not used.

Leica scope image © 2009 Mike McDowell

Friday, September 25, 2009

Leave your Camera Attached!


I'm sure you've seen the following digiscoping practice in the field. Using a spotting scope, a birder scans terrain and habitat when something of interest grabs his attention. Perhaps it's a shy Sora that has sauntered into the open from thick marsh grasses, or maybe a beautiful Magnolia Warbler has perched on a bare branch. Now the birder turns digiscoper, swings his scope around, focuses the eyepiece on the bird, removes his digital camera from a pouch or coat pocket, brings its lens up against the eyepiece, and proceeds to take photographs without refocusing the spotting scope's eyepiece.

One of the most common complaints from digiscopers, novice and experienced alike, is that their images often appear out of focus. Well, it's probably not the equipment. The blame falls squarely on the above focusing method.

Here's why.

Consider the fact that when you're sharing your spotting scope with another birder, they'll often need to refocus the image after you've finished looking through it. This is due to the great variance in how our eyes are uniquely imperfect:


Unless you happen to have exactly the same vision as the other birder, you'll generally disagree what the spotting scope's perfect focus is. Even subtle structural differences in your eyeball will account for the disagreement in focus.

The problem with the above focusing method becomes clearer when you consider that the digital camera acts like another person's eyeball. There's no guarantee that what the camera "sees" as a perfectly focused image is the same for you, or another birder. Hence, if when digiscoping you focus through the eyepiece of a spotting scope and then hold the camera to the eyepiece without refocusing, there's a pretty good chance the image will be out of focus, even when an auto-focus is applied.

The majority of world-class digiscopers I know tend to leave their digital camera attached to their spotting scope for the duration of their digiscoping session. I'm no exception. However, when I first began digiscoping over 8 years ago, I fiddled around with several different focusing techniques before settling on just one. Today I have a tendency to divide my outdoor excursions into two categories: Birding or Digiscoping and seldom mix the two activities. When I choose to go birding, I generally won't carry my spotting scope along. On those particular days I desire to enjoy birds as an observer and documenter. However, on digiscoping days I configure my spotting scope for digital photography before I go out in the field. The camera's turned on. I'm ready. I use my binoculars to scan for potential subjects, and then carry my rig to the spot. In preparing to take a photograph of a bird, I locate, view, and focus the image via the camera's LCD monitor. Whatever your personal vision is, what's in focus for you on the monitor should be in focus for everybody else.

© 2009 Mike McDowell

Friday, August 21, 2009

Digiscoping Math!


Curious digiscopers often want to know the effective focal length of their digiscoping rig. Once you have a few specifications for your gear, the rest is pretty easy to calculate.

Here's the formula for point & shoot digital cameras:


fl = focal length
ozmeq = optical zoom (in 35mm equivalency)
epmag = eyepiece magnification

My Nikon Coolpix 8400 has an optical zoom range of 24 to 85mm (in 35mm equivalency). We'll do the math for the upper value of the optical zoom, so ozmeq will be 85. I usually digiscope with my 20 to 60x zoom eyepiece at 20x, so epmag is 20:


The result is an effective focal length of 2,429mm!

The formula when afocally coupling DSLR cameras to the scope's eyepiece is very similar, but since were' working with removable DSLR lenses, we can assume 50x = 1. However, we need to figure in the crop factor of the camera's sensor and adjust for the focal length of whatever lens is being used:


fl = focal length
sensor = DSLR sensor size
epmag = eyepiece magnification
lens = focal length of the camera lens.

We'll use the values for the Pentax K100D and a 40mm pancake lens, so our value for lens will be 40. The K100D's sensor size is 23.5mm, so that's our value for sensor. Because it's smaller than 35mm, it's frame is slightly magnified (crop factor), so this needs to be taken into account when calculating the effective focal length. As above, we're using an eyepiece magnification of 20 power:


The result is an effective focal length of 1,191mm!

Naturally, knowing the effective focal length won't make you a better digiscoper. At no time during my 8 years of digiscoping did knowing any of these numbers provide any advantage while in the field!

© 2009 Mike McDowell