


Ryan Brady writes: "I get a significant area on the periphery of my field of view that's OUT of focus. Even if the subject or other objects are on the same focal plane as what it's in the center of the scope, the outer edge is always out of focus while the center is sharp. Now we all know that you can get sharper pictures at lower magnification, but for me, 30x is perfect for a complete shot. The problem has really come to light with these Great Grays, which are so big and usually so close that I can barely fit them in the field of view. But if their head is anywhere near the top of the field, it gets out of focus."
That's correct, Ryan!
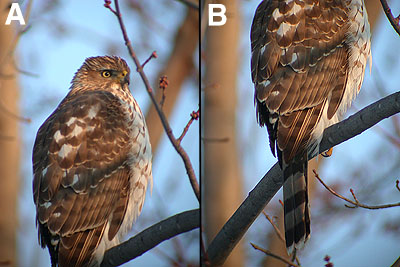
Edge distortion is a big problem when digiscoping larger birds, especially owls and other birds of prey. One thing that works to the digiscoper's advantage is that larger birds of prey are often very stationary (unlike most songbirds). This presents a technical solution to the problem that I've found to be effective. Because the sharpest area of the field of view is the middle, I will take one exposure by centering near the bird's face (image "A") and then quickly take another shot of the rest of the bird's body (image "B"). These two images are loaded into Adobe Photoshop and carefully stitched together.
The process is somewhat tedious, but with enough practice you can make it look seamless:
- Load the two images to be stitched into Adobe Photoshop and then create a third image that is twice the size as one of the single images.
- SELECT & COPY each image and then PASTE it into the large image. Automatically, image "A" is made into one layer and image "B" a second layer as they are pasted.
- Use the MOVE tool to overlap the images.
- Next, use the adjust LEVELS to match the brightness of the intersecting edges as closely as possible.
- Using the ERASER tool, remove image data along the edge from the upper layer, revealing data from the lower layer. In detailed areas you often only need to erase a small portion to blend the two images together. In open areas, like a blue-sky background, you might have to erase more area for the blend to be successful.
Link: Stitched result of multiple Cooper's Hawk images.
Cooper's Hawk images © 2005 Michael Allen McDowell


